Showing posts with label Desserts. Show all posts

Tuesday, August 25, 2020

Grilled Banana Sticky Rice- Chuoi Nep Nuong

Today I finally try to grill these bananas in sticky rice. It's not hard just need patience when grilling. I used my smokeless indoor grill and it took at least an hour. I just let it grill and flip once in a while....while watching drama to kill time.😁 You can use airfry too but my airfry too loud and I didn't want to run that for an hour. You can also use a bbq grill or even bake in oven. After grilling the sticky rice will be chewy and crunchy...totally something I like to eat.πŸ˜‹


Keep them totally wrapped in banana leaves and only remove the wrap after the wrapper dried out.

I followed recipe from Nathafood

Thursday, August 13, 2020

Fried Bananas - Chuoi Chien

My mom couldn't control herself when she sees beautiful bananas! She bought a lot so we are frying some. Have to think of other ways to eat these bananas another day.πŸ€ͺ

I'm using Bethkitchen's recipe. Instead of heating 2 tbsp sugar, I used 4 tbsp. 


Thursday, May 30, 2019

Sweet Corn Pudding (Che Bap)

It's summer time and there are abundance of corns. Bought a lot so made some dessert for party. It was so yummy, all gone in an 1hr.😁 I love the chewy glutinous rice and crunch of corn in every bite. Everything delicious serving with coconut milk. I also made Portuguese egg tarts at friends party as requested. Everyone super happy!πŸ˜‹πŸ˜‹πŸ˜‹

 Cooking the naked cobs gives more flavor


Portuguese egg tarts


Serves 15-20 people

Ingredients:

10 ears of corns
1 cup glutinous rice
3/4 cup sugar
1/2 tsp salt
2 liter +500 ml water

1/4 cup white small tapioca 
3 tbsp tapioca starch + 1/4 cup water

Method:

1. Clean the corns and use a sharp knife to shave the fresh kernels as thin as possible. 


2. In a pot add in the water (optional put naked corn cobs in) and bring to boil for few minutes. Remove naked corn cobs and add in the shaved corns. Bring to boil and remove foam. Then turn heat to medium.


3. Rinse the glutinous rice and then pour into the pot. Stir to prevent rice sticking to the bottom of pot. Cook until rice is tender about 10 minutes. 


4. Add in tapioca and stir. Need to stir occasionally to prevent burning on bottom. Cook for about 7 minutes more.

5. The corn and rice should thicken up at this point. Add in the sugar and salt. Stir and taste. Mix the tapioca starch with water and slow stir into the corn. The corn pudding should be thicken but not dry. Rice should be cooked but not mushy.

6. Remove from heat and let it cool. It will thicken up more as it cools.


Coconut Milk:

2 can coconut milk 14oz each
6 tbsp sugar

1/4 cup water
1/4 tsp salt
2 tbsp tapioca starch + 1/4 cup water

1. Bring coconut milk, 1/4 cup water, sugar, and salt to a slow boil. Then slowly pour in the starch water. Do not need to pour all starch into the coconut milk. The coconut milk should be slightly thicken with a hint of sweet and slight salty.

To serve: Pour some corns into a bowl and add in coconut milk. Serve hot or cold.


* Refrigerate leftover pudding. Heat to warm in microwave next day still delicious! 

Tuesday, March 26, 2019

Cream Puffs/Crack Buns/Choux Au Craquelin

Finally baked some cream puffs with crispy top for dessert tonight! Filled half with just whipped cream and half with cream cheese! Both taste very yummy but kids of course only want whipped cream. I will certainly make these again as it's easy and delicious!!!πŸ˜‹πŸ˜‹πŸ˜‹Daughter already asking when I'm making again. πŸ˜†


Finished baking
After 15 mins
I doubled recipe for 18 puffs enough for 6 people
Crispy topping


Puffs batter


Recipe from➡️ CookingTree -Cream Cheese Cream Puffs
9 small puffs about 2 inches

Ingredients

Crispy Topping:
35g Unsalted butter
25g Sugar
35g Cake flour

Puffs Batter:
30g Unsalted butter
33g Water
33g Milk
a pinch of Salt
40g Cake flour
75g Egg

Cream Cheese Whip:
300g Cold cream cheese
1/4 tsp Vanilla bean paste
Whipped cream (170g whipping cream + 35g sugar)

Instructions:

1. Cream butter and sugar. Then add in flour and mix well. (I used food processor and blend into dough). This is for crispy topping

2. Push flat on two sheets of parchment or plastic wrap and put in refrigerator or freezer.

3. Put butter, water, milk, and salt in the pan. When the edge boils and butter melted, remove it from the fire.

4. Add the flour and mix well into smooth dough. Place back into low heat to continue cooking dough until smooth and not stick to pan. Turn off. Let warm. Then mix in the gently whisked eggs in 3 portions until smooth batter.

5. Put batter into piping bag with 1A tip. Pipe into small desired size onto parchment paper or silicone tray.  (Mine is about 1.75 inches)

6. Use circle cutter to cut crispy topping about the same size as piped puffs about 2 inches. Place crispy topping on top of piped batter.

7. Bake in preheated over 375F (190C) for 13-15 minutes. Then lower oven to 320F (160C) for 15-17 minutes. Then turn off oven, leave door slightly open for 30 minutes to slowly cool puffs.

8. Whip heavy whipping cream with sugar. Set aside.

9. Whip cold cream cheese, add vanilla paste and mix well. Add in whipped cream and gently fold whisk together.

10. Make a hole in the bottom and fill the puffs with cream.

Enjoy!

Tips: Only fill the one you will eat as the puffs will soften over time. Unfilled puffs can heat in 150C (300F) oven for 5-8 minutes to crispy. Cool and then fill in cream.


Wednesday, March 20, 2019

French Caneles -Silicone and Egg Tart Molds

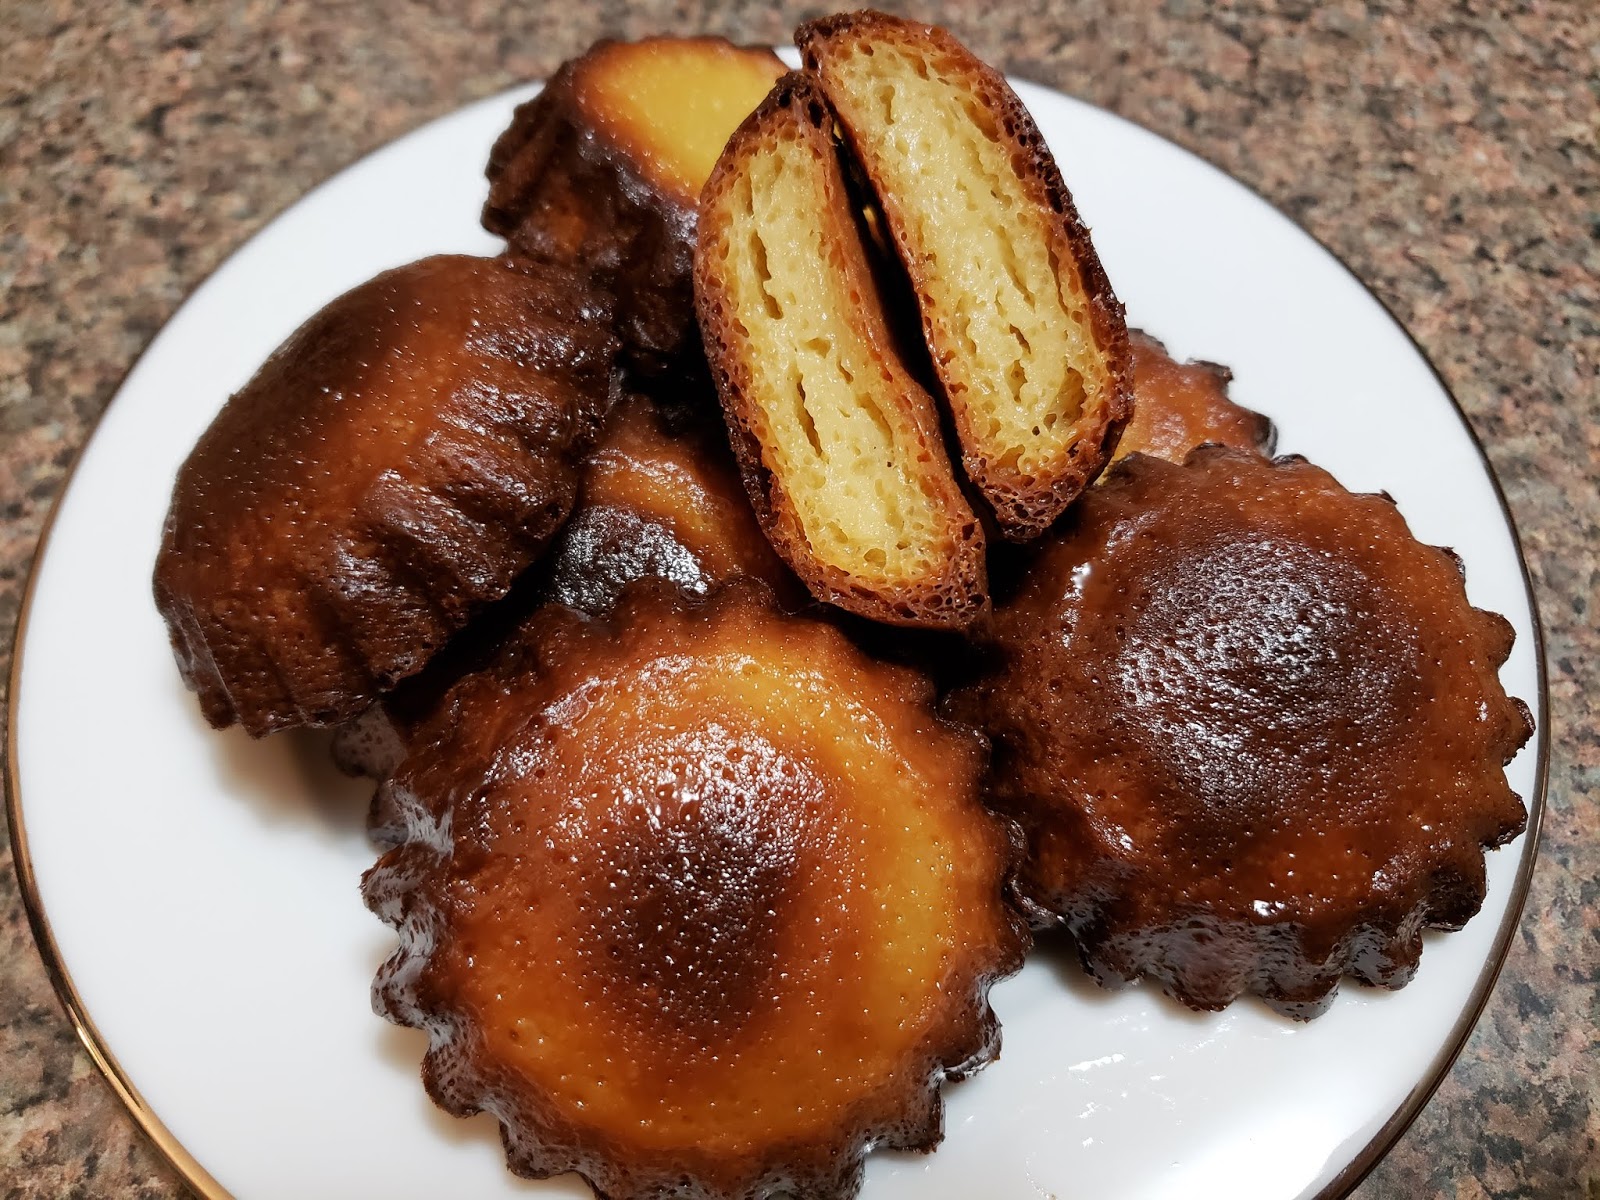
Today I'm baking caneles again using my silicone molds. I also test using egg tart molds with my leftover batter. The result is just as tasty! I doubled my recipe thinking I'll save baking time...but No.πŸ˜‚ I had to double my baking time to get the dark brown crust. Silicone is not the best mold to use but with longer baking time and rotating, you'll get great result!πŸ˜†πŸ˜‹πŸ˜‹


Using egg tart molds. Need to remove before silicone molds since aluminum get better heating.

Caneles almost done baking. Rotate pan since inner silicone not expose to enough heat
After rising high and falling back down. Help it back down if some get stuck.
Caneles rose really high but should fall back down later
Filled batter little above 3/4 high
Batter after overnight refrigerate. Stir and strain again before baking
Paste like batter without hot milk


Recipe adapted from Bruno Albouze
36-38 medium size. Can use half recipe.

Ingredients

4 cup whole milk (1000 ml)
6 tbsp unsalted butter
2 tsp vanilla extract
6 egg yolks
2 whole egg
2 cup sugar
240 g all purpose flour
6 tbsp cornstarch
3 tbsp Grand Marnier or dark rum
soften butter to brush inside silicone molds

Instructions

1. Place milk and butter in pot and bring to boil. (Keep eyes on milk making sure not over boil)

2. While milk is cooking.  In a bowl whisk together yolks, whole egg, sugar, vanilla, flour and cornstarch to paste. 

3. Once milk boiled, add a small amount into egg mixture. Stir. Adding only a little milk at a time to prevent cooking egg. Gradually add in all the milk while stirring to combine everything together.

4. Add in the Grand Marnier. Let batter cool, cover and refrigerate overnight. Best 24-48 hrs. But if you can't wait then at least 1-2 hrs.(highly recommend overnight)

5. 30 mins before baking, take batter out to let it come to room temperature. Stir and strain with a fine mesh.

6. Brush soften butter to silicone molds. Refrigerate the molds 10 minutes to harden butter.

7. Preheat oven 465F.

8. Place silicone molds on a baking tray. Stir the batter and fill a little above 3/4 of mold but not full.

9. Bake at 465F for 10 mins. Then reduce to 375F for 1 hour ++. These temperatures are for silicone molds. Baking time will be less for copper and steel molds. ++(Since baking so many, require to bake longer 40-50 minutes more to get dark brown crust. Rotate pan and molds in between .

10. Remove caneles from molds and let it cool completely before serving. Caneles get the crispy caramelized exterior once cooled. (If remove and they're not completely dark brown then can put back in oven to continue baking.)

Enjoy!

* The crust only stay crispy for 8 hrs. Leftovers can heat in oven again and cool for the crispy crust again.

Friday, March 15, 2019

Steamed Milk Custard with Coconut milk and Ginger (Dun Nai)

Doing something good for my throat today by using up my egg white to make steamed milk custard. I'm adding ginger and some coconut milk for a nice flavor. It is so soft and silky just like eating tofu custard (tofu fa). This can be eaten hot or cold. I like it hot to soothe my throat and cough! πŸ˜‹πŸ˜‹πŸ˜‹


lightly stir whites
Strain the mixture


Ingredients:

1 cup milk
1/2 cup coconut milk
2 large egg whites
45 g sliced ginger (if want intense ginger flavor then blend and squeeze out juice)
3 tbsp sugar


3-- 6 oz bowls

Method:

1. Heat water for steamer.


2. Boil the coconut milk with ginger and sugar. Remove from heat and slowly add in the cold milk. Remove the ginger. Using clean hands, try to squeeze out the ginger juice.


3. Lightly stir egg white. Keep on stirring when pouring milk mixture into egg white. When almost all egg whites dissolve then strain again. Careful not to beat too hard to cause bubbles. Strain twice.


4. Pour the milk into 3 bowls and then cover with aluminum foil. Steam on medium heat for 20 minutes. Do not have high steam as this can cause bubbling and not smooth texture.


5. Serve hot or chilled.

Tuesday, March 12, 2019

Taro Sticky Rice Pudding- Che Khoai Mon

Last week went shopping and saw taro looking so good so I bought a piece home. Then I left it in the refrigerator doing nothing to it since I was sick. If I continue to let it sit there then it will rot! So I cooked it with sticky rice for dessert.  I blended the pandan leaves to soak the rice for pandan fragrance and color.πŸ˜‹


 Remove foam
 Steamed taro
Soaked in pandan water


Ingredients

2.5 lbs taro before peeling
1.5 cup glutinous rice (sticky rice)
3/4 cup sugar
1/4 tsp salt
6 cups water
4-5 pandan leaves
1/4 tsp pandan paste
1.5 tbsp tapioca starch+1/4 cup water

Coconut Milk:
1 can 14 oz coconut milk
3 tbsp sugar
1/4 tsp salt
1+ 1/4 tsp tapioca starch+1/4 cup water

Instructions:

1. Wash glutinous rice and drain off water.

2. Use 2 cups of the water and blend with pandan leaves. Run it through a fine strainer. Use the pandan water plus 1/4 tsp pandan paste to soak glutinous rice for 30 minutes.

3. Remove taro skin and cut taro into 1/2-1 inch cubes. Soak in water while cutting the rest. Drain off water and team for 15 mins until cooked. (cooked if easily poke through with chopstick)

4. Bring the remaining 4 cup water to boil. Add in the pandan glutinous rice. Cook until rice just open. Remove green foam. Stir to prevent rice sticking to bottom of pot. Add in sugar and salt. Taste.

5. Pour the steamed taro into the cooked rice. Stir gently to prevent breaking taro. Stir in the tapioca starch water and mix well. Let it cook for a minute. Remove from heat.

6. Bring coconut milk to a simmer boil. Add in sugar and salt. Slowly stir in tapioca water to thicken. (Do not pour all in at once...will cause milk to be lumpy.)

7. To serve pour coconut milk over taro pudding.

Enjoy!

Sunday, March 3, 2019

Cendol Microwave Method (Che Banh Lot)

Today is raining and snowing outside but I really want some cendol so hurried and made some! Now I'm sitting under a blanket after eating...lolπŸ˜‚

Cendol with mung bean paste, rubies chestnuts, grass jelly, toddy palm, served with palm sugar syrup and coconut milk.πŸ˜‹πŸ˜‹πŸ˜‹


Ingredients:

1 cup rice flour
2 tbsp mung bean starch (can use tapioca starch)
3 3/4 cup red limestone water or white limestone water
1/4 tsp salt
1.5 tsp pandan paste


1 potato ricer (or anything with holes)
a big bowl of ice water

Coconut milk:
1 can 14 oz coconut milk + 2 tbsp sugar +1/4 tsp salt

Cook the coconut milk mixture until boil and let it cool.

Syrup: half the recipe if not eating too sweet. This amount of sugar is for double the recipe.⬆️
250 gram palm sugar + 1 slap brown candy sugar + 2 cup water (use 1 cup for thicker syrup)
Boil the palm sugar, rock sugar, and water until sugar melt about 10-15 minutes.

Instructions:

Limestone water- 2 tbsp limestone mix with 8 cups water. Stir well and let lime crystals sink to the bottom at least over 1-2 hr. Just use the clear water. Better to strain over paper towel. (Note: Add more water to the lime crystals after each use and you can use it again and again.)

1. Mix rice flour, mung bean starch, 3 3/4 cup limestone water, salt, pandan paste together in a microwavable bowl. (I used thick glass bowl so needed longer cooking time.)

2. Microwave the mixture 1 minute at a time until the mixture is slightly thicken and cooked. Each time take the mixture out and stir well with chopsticks. Put back in and continue until mixture is cooked and translucent. I microwave it for 15 times=15 minutes because of thick glass bowl.  Can test cendol by dropping a piece in water. If its silky smooth without breaking then its good.

3. Have a large bowl of ice and add in some cold water. Now quickly pour some mixture in the ricer and press lightly to desire length. The cendol should fall freely in the water when you press it. Continue until all mixture is gone. Add more ice if water is warm. The cold water is very important for the hot mixture to harden. Drain the cendol out of the ice water and serve. (Note: must work quick before the mixture gets harden. Once harden it, your cendol will not come out smooth.)


4. To Serve: Put some cendol in a cup. Add in 2-3 tbsp syrup, ice, and coconut milk. Serve cold. 

You can serve this with mung bean paste , grass jelly, toddy palm, rubies chestnuts..etc

Ruby Chestnuts Recipe:

6 large chestnuts diced (about 100g)
1/2 cup tapioca starch
2-3 drop red food coloring

1.  Soak diced chestnuts with red food coloring. Use only few drops of water to mix. Leave for few minutes then drain off any water.
2.  Coat chestnuts with tapioca starch.
3.  Boil a pot of water. Add coated chestnuts in when water on rolling boiling. Cook until chestnuts float and transparent. Remove and rinse in cold water.


Mung Bean Paste: 

1/2 cup split mung bean without skin
1 1/4 cup water
2 tbsp sugar

Wash mung bean with water until clear. Place in ricer cooker with 1 and 1/4 cup water. Press quick cooking. Add sugar once mung bean cooked. Use the rice paddle and mash mung bean to paste while hot. 

Thursday, February 28, 2019

Caneles

I have not make these French caneles for a while so making them again today. I should have double my recipe because all these were gone before my post. These are crispy chewy outside and soft custardy on the inside. These taste like egg tart, flan, custard, and creme brulee! I will definitely double the recipe next time. I used silicone molds for these so they are not uniform in color. If you can get copper or steel molds even better!


Recipe adapted from Bruno Albouze
12 large or 18 medium

Ingredients


2 cup whole milk (500 ml)
3 tbsp unsalted butter
1 tsp vanilla extract
3 egg yolks
1 whole egg
1 cup sugar
120 g all purpose flour
3 tbsp cornstarch
1.5 tbsp Grand Marnier
soften butter to brush inside silicone molds

Instructions

1. Place milk and butter in pot and bring to boil.

2. While milk is cooking.  In a bowl whisk together yolks, whole egg, sugar, vanilla, flour and cornstarch.

3. Once milk boiled, add a small amount into egg mixture. Only a little at a time to prevent cooking egg. Gradually add in all the milk while stirring to combine everything together.

4. Add in the Grand Marnier. Let batter cool, cover and refrigerate overnight. Best 24-48 hrs. But if you can't wait then at least 1-2 hrs.(highly recommend overnight)

5. 30 mins before baking, take batter out to let it come to room temperature. Stir and strain with a fine mesh.

6. Brush soften butter to silicone molds. Refrigerate the molds 10 minutes to harden butter.

7. Preheat oven 465F.

8. Place silicone molds on a baking tray. Stir the batter and fill a little above 3/4 of mold but not full.

9. Bake at 465F for 10 mins. Then reduce to 365F for 1 hour. These temperatures are for silicone molds. Baking time will be less for copper and steel molds.

10. Remove caneles from molds and let it cool completely before serving. Caneles get the crispy caramelized exterior once cooled. 

Enjoy!


Wednesday, February 27, 2019

Cendol- Che Banh Lot #2

I have always make cendol using rice flour for a more soft silky chewy texture. Recently tried different way by using only mung bean starch. It is more on crunchy and chewy side. Pretty good when adding in other ingredients such as jelly, mung bean paste, ruby chestnuts...etc.


Recipe from thewonglist. Visit website for more detail picture instructions.

Ingredients:

30 pandan leaves (used only 5+ add 1/2 tsp pandan paste)
100 gm mung bean starch
1/2 tsp alkaline water
1/2 tsp salt
3 tbsp sugar
650 ml water

Method:

1. Blend pandan leaves with 650 ml water. Strain over fine mesh strainer and use only 625 ml water.

2. Place pandan water in a pot, add in mung bean starch, alkaline water, salt, sugar, and pandan paste. Stir well and let it sit for about 30 minutes.

3. Place pot on stove and cook mixture until translucent green. Stirring the whole time to prevent burning.

4. Prepare ice water bath. Once mixture is cooked then use a potato ricer to push it thru into water bath.

5.  Serve cendol with coconut milk and sugar syrup over crushed ice.


Coconut milk:

1 can 14oz coconut milk + 2 tbsp sugar +1/4 c water +1/4 tsp salt
Bring to simmer boil. Cool

Sugar syrup: 
half the recipe if not eating too sweet. This amount of sugar is for double the recipe.⬆️

250 gram palm sugar + 1 slap brown candy sugar + 2 cup water (can use 1 cup for thicker syrup)


Cook sugar syrup for 10 minutes until all sugar dissolved. Cool


Alkaline water

Saturday, February 23, 2019

Butterfly Pea Coconut Water Konnyaku Jelly

Today I'm testing out the blue butterfly pea powder I bought awhile back. I only used 1/4 tsp of the blue pea powder and it is already so dark!πŸ˜ͺ I will definitely need to use less next time for a lighter blue.

I wanted to use fresh young coconut but coconut not so good here so I bought frozen. Making jelly with coconut water is really refreshing and delicious. πŸ˜‹πŸ˜‹πŸ˜‹


Ingredients:

1200ml coconut water
1 pk konnyaku jelly powder 10g
1/3 cup sugar
1/4 tsp or less butterfly pea powder
2 tbsp water

1. Mix jelly powder with sugar.
2. Bring coconut to boil.
3. Stir in jelly powder. Taste. Add in more sugar if not sweet enough. Let boil about 3-5 minutes.
4. Dissolve butterfly pea powder with water.
5. Remove some clear jelly to mold. Then add in the butterfly pea water to mix.
6. Pour into molds.  Konnyaku jelly harden quickly so need to be fast when pour into molds.
7. Cool and refrigerate.  Serve cold