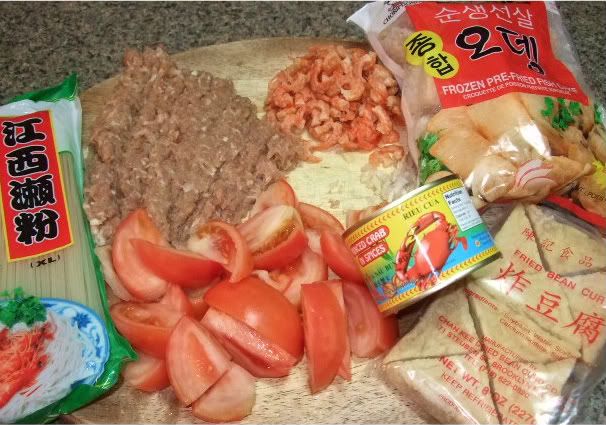
Friday, March 27, 2009

Three Tresure Dish (Sam Bo)

One of the good dish to serve with rice. I once ate this at the restaurant and decide to make my own to save some money...lol. The three treasure include tofu, eggplant, and bell pepper. Stuff them with meat and then stir fry them. I made a big dish for the whole family since I got everything extra...lol. Cut the recipe in half and you get a regular size dish.


Ingredients:

Meat Stuffing:
600 gm ground pork
30 medium shrimps (flatten)
1 tsp salt
1tsp sugar
1 tsp fish sauce
1 tsp oyster sauce

2 eggplants sliced 1 inch thick
2 raw tofu (fried) and sliced
2 bell peppers (cut in chunks)

Seasoning Sauce:
1 1/2 cup water
2 tbsp oyster sauce
4 tsp fish sauce
1 tbsp dark superior soy sauce
1 tbsp soy sauce
1 1/2 tbsp sugar
1/2 salt
2 tbsp cornstarch or tapioca starch


Method:

1. Mix the meat and shrimps with seasoning. Add in a tbsp water if meat too dry.
2. Cut a small hole in the middle of the eggplants and tofu so the stuffing stay in place when fry.
3. After stuffing, fry the meat side down first. Fry it until half cook and then flip over to fry the other side.
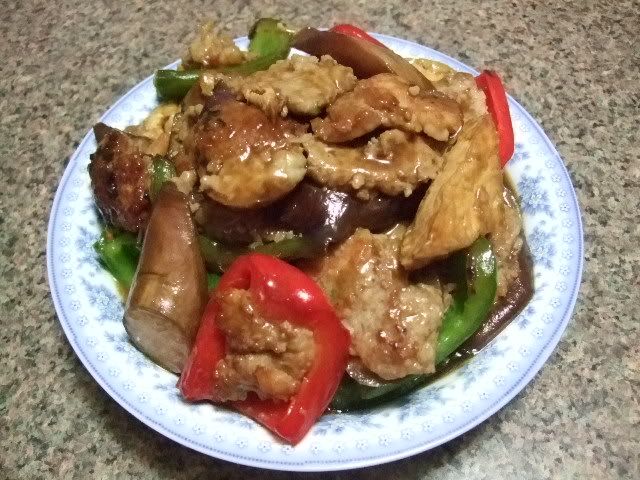
4. Mix all the seasoning sauce ingredients together, except for cornstarch. Pour 1 cup of the sauce in the vegetable and let it bring to boil. Add the cornstarch to the left over sauce. Now pour it all over and stir gently until thicken. Once the meat is cooked then it is ready to serve.
5. Serve with white rice.

Tuesday, March 24, 2009

Snap Peas Mushrooms

What's for lunch today? Well something easy and fast to cook. Got these interesting mushrooms and they taste delicious. My whole family love them.


Ingredients:
1 lb mushrooms
1 lb snap peas
20-30 medium shrimps devien
3 pieces of garlic
1 tsp XO sauce (optional)
2 tbsp oil
1/2 tsp salt
1/2 tsp sugar
1 tsp fish sauce
1 tbsp oyster sauce
1 tsp soy sauce
1/4 cup water
1 tsp cornstarch


Method:
1. Boil a small pot of water. Put the peas in and take it out after 30 seconds. Then rinse in cold water. Now put the mushroom in the boiling water for 30 seconds and then take it out to rinse in cold water.

2. In a pan heat the oil and fry the garlic until golden. Add in the XO sauce and then the shrimps. Give it a couple stir. Add in a dash of salt and sugar.

3. When the shrimps are slightly pink, add in the peas. Give it a couple stirs. Now add in the mushrooms. Again a couple stirs. Add in the seasonning for taste. Mix in the cornstarch with water and then pour all over the veggie. Stir while pouring the cornstarch mixture. Do not stir fry too long or the peas will be soft and not crunchy.

4. Serve with white rice. Use fish sauce and chillies for dip.

Thursday, March 19, 2009

Fried Rice Cakes with Eggs (Banh Bot Chien)

One of my fiance's favorite bot chien with eggs and scallions. This is my first time making this and it taste delicous. For one rice cake you can make 3 dishes out of it. You do not need to make everything at one time. Can always save the cakes for next day.

day 1 with onions. Very good since the onion give it a sweet flavor.
day 2. No onion but more eggs and scallions
This is how it should look like. Pour eggs and scallion over it and then flip to cook.

Picture of the flour and the sauce.


Ingredients:
1 bag of rice flour (1lb)
3 tbsp cornstarch or tapioca starch
1/2 tsp salt
1/2 tsp sugar
1/4 tsp MSG (optional)
2 tbsp oil
7 cups water


For stir-fry:
1 bunch scallions (the more the better)
10 eggs (for the whole cake)
Onions (optional)


Dipping sauce:
Use dim sum sauce or make your own.
1/4 cup soy sauce
1/2 cup water
1 1/2 tbsp sugar
2 tbsp vinegar
3 hot chillies chopped

Mix everything together and taste. Best to add in Sriracha hot chili sauce when eat.


Method 1:
1. Mix everything together and stir well.

2. Heat a pot of water to steam the cake. Once water hot, pour misture in a pan and steam for 30-40 minutes until done. When insert a chopstick in and it comes out clean then it is done.

3. Have to let the cake cool and harden before cutting. Cut the cake into 1-2 inch rectangle pieces.

4. Use some oil to fry the cakes until golden brown and crispy. Fry both sides.

5. Add in as much eggs and scallions as you like. Stir fry until cook.

6. Serve with soy sauce and hot sauce.


Method 2: I think this method is better as the cake come out softer and easier to steam and cut.

1. Mix all ingredients together for rice cake.

2. Put the mixture in a pot and heat until slightly thicken. Remember not to turn fire too high. This part is very tricky as you have to constantly stir the mixture to prevent uneven cooking. (Best if you use a beater to blend it afterward for a more smoother texture.)

3. When mixture is slightly thicken, pour in an oiled pan. Then steam until cook. The steam time should be shorter and the outcome should be better. :)

Tuesday, March 17, 2009

Gui Ling Gao (Chinese Herbal Jelly)

I made some herbal jelly and it is a lot better than the already made one from the stores. What is herbal jelly and why is it good for you? Gui ling gao is translated as tortoise jelly. But not to worry as there is no turtle parts in the ingredients. Maybe back in the old days they do but not now as it is illegal to use turtle. The herbal jelly is made out of different herbs and flowers. It help nourish our yin and clear body heat while resolve blood toxin. Also specially effective on recovering skin disorder. The taste might be a little bit bitter but taste great with syrup. Eat this chilled and it's a great dessert. A healthy one at least. :) I'm eating at least one bowl a day since I really need to remove all the heat inside me...all those hot chillies, fried food, and sleepless nights.


Ingredients:

5 bags of gui ling gao powder
4 1/2 cups water
100 gm rock sugar
1 slab of candy sugar
3/4 cup water

Method:

1. Put 3 cups of water in a pot with the rock sugar. Boil until rock sugar dissolve.

2. While boiling sugar water, mix the 5 bags of jelly powder with 1 cup water. Mix well with a whisk.

3. After the sugar water is ready, slowly pour in the jelly powder mixture. Whisk at the same time when pouring in the sugar water. Risk the bowl with rest of the 1/2 cup of water and pour in the pot. Whisk fast to prevent lumps and for a smooth texture. The jelly thicken up really quick so prepare the molds a head of time.

4. Pour the thick jelly into the molds and let it cool and set. It will set once it cooled. Put all the jelly in the refrigerator.

5. In another pot, mix the sugar slap and 3/4 cup water to make syrup. Boil the sugar until it dissovle and bubble up. It is have a consistency of the honey. Do not over boil as it may get too thick. If that's the case then add more water in and continue to bring to boil again only until it slightly thicken.

6. Pour some syrup over cold jelly and serve.

Optional: You can serve this with honey, condensed milk, or canned fruits.

Saturday, March 14, 2009

Fresh Coconut Jelly

So I did an experiment with konnyaku jelly power and agar agar. For one bag of konnyaku jelly powder you only need 3 fresh coconuts. Guess my previous assumption was wrong. Sometime one coconut have more than 400 ml liquid. I guess I got some really big coconuts...lol. So for the extra coconut, I used agar agar. The look of and taste of the konnyaku and agar are very similar. However, I think the konnyaku is a lot better. Konnyaku is more chewy and smooth compared to agar agar. The texture of the agar is more crunchy and soft....not as smooth when you scoop it. I prefer the konnyaku jelly! :)


Ingredients:

3 fresh young coconuts (about 950-1000 ml liquid)
2 1/2 tbsp sugar
1 bag konnyaku jelly powder (10 gm)

Method:

1. Cut the fresh coconuts and remove the juice. Add in the sugar to taste.

2. Mix the konnyaku jelly powder with the coconut juice. It is easier to dissolve the powder with the juice first as it get lumpy when mix in direct boiling liquid (harder for it to dissolve). Stir continously and bring to boil.

3. Pour the jelly liquid back into the coconuts. The jelly will set fairly quick. Best to leave jelly in the refrigerator so it'll be nice and cool.


Optional: I added extra coconut meat from the can. This way I get to eat the coconut meat in every bite.. :) You can leave the jelly in the refrigerator for 3 days and it'll still taste great!

Tuesday, March 10, 2009

Coconut Jelly

I love this coconut jelly! They sell it frozen but it's cheaper to make your own. Very refreshing if you can find fresh young coconuts. I was only able to get one fresh coconut at the supermarket. So I decided to get the canned coconut with syrup to mix it with the fresh coconut. The result is great since I didn't need to add much sugar. :) One bag of Konnyaku power call for 950 ml liquid. I didn't have enough coconut juice so I only used half a bag.


Ingredients:

1 young coconut (about 250 ml juice)
2 cans young coconut in syrup (total of 400 ml syrup)
1 tbsp sugar
5 gm konnyaku jelly powder (half bag)


Method:

1. Cut the fresh coconut and remove the juice. Mix with the can coconut syrup. Bring to boil.
2. Mix the jelly powder with sugar. Add this mixture in the boiling juice. Stir until mixture dissolve. (Strain the juice since some powder might not dissolve successfully.)
3. Prepare the molds. Place the can coconut meat in the molds and in the fresh coconut. Pour the jelly liquid in the molds and coconut.
4. The jelly will set fairly quick. Best to leave jelly in the refrigerator so it'll be nice and cool.

Orange Madeleines

I was craving for some cakes, so thought of making the madeleines. Yes, craving for some cake at 3 am...lol. First time trying it and it's pretty good. My friend Mark shared this recipe but I didn't have lemon so I used orange zest instead. The outcome is nice and fluffy.


Ingredients:

Makes 1 dozen

1/2 Cup Sifted All Purpose Flour (take out 1 tbsp)
1/4 Cup Unsalted Butter, softened
1/2 Cup Sugar (take 1 tbsp out if don't want to be too sweet)
2 Eggs Separated
1/2 tsp Vanilla extract
1 tsp Orange zest

Confectioners Sugar to sprinkle on top when cooled!

Preheat oven to 375 degrees

1. Generously grease the Madeleine Molds with Butter. (Optional if you have nonstick pan)
2. In a small bowl, cream together the butter and half the sugar. If butter is hard, microwave for 20 seconds. 10 seconds each time. Do not melt it.
3. Add the egg yolks, one at a time, beat well until the mixture is smooth.
4. Add vanilla, orange zest and flour. Mix well with a spoon.
5. In a large bowl, beat the egg whites until soft peaks form when you lift the beater.
6. Fold the egg whites into the batter, a little at a time, until it is fully blended. Best to us a spatula to rotate the batter and egg white together.
7. Fill each mold about 2/3's full (about 1 full tbsp each) and bake the cakes for 4 minutes and then turn the temperature down to 350F. Bake for another 6 minutes until slightly browned on the edges and top. Watch it or it'll burn!

Saturday, March 7, 2009

Mango Sticky Rice

This is a popular Thai dessert. At first I think it might be weird to eat sticky rice with fruit. But after trying I think mango and stick rice is a good combo. The fruit is refreshing and the sticky rice is soft and chewy with coconut aroma. I think it takes too long to steam the sticky rice so I place it in the rice cooker instead. The result is fast and still good.


Ingredients:

1 1/2 cup sticky rice (glutinous rice) soak for at least 2 hrs
2 ripe mangoes
1 can coconut cream or milk
3 1/2 tbsp sugar
1/2 tsp salt
1 tbsp corn starch (or tapioca starch)
1/4 cup water
1/4 tsp salt

Method:

1. Wash soaked rice and place in rice cooker with half can of coconut milk, 2 tbsp sugar, 1/2 tsp salt. Mix well and cook. The coconut milk should be a little above the rice.

2. While the rice is cooking, we can place the other half of the coconut milk with 1 1/2 tbsp sugar, 1 tbsp corn starch, 1/4 tsp salt, and 1/4 cup water. Mix well and bring to boil. Stir constantly until slightly thicken.

3. When rice is cooked, fluff it with a pair of chopsticks. Scoop the rice into a bowl to and press to form shape. This way the rice and stick together.

4. To serve, peel and slice half a mango on the rice. Pour coconut milk over and server warm.

Serve 4

Thursday, March 5, 2009

Cherry Blossom Tree

I finally finish painting my cherry blossom tree in the basement wall. Now I need to paint two swans, birds, more flowers under the tree, and a pond. Hmmm....sound like a lot of work. :) Gonna take me some more time since I'm so lazy...hehehe. Do I know how to paint swan??? Gosh, it will be hard. :( If not then I'll paint something else that is easy. :)

The wall is at least 8x14 ft.


Wednesday, March 4, 2009

Fast Noodle Soup (Bun Rieu)

I was hungry for some noodle soup but did not want to go shopping for grocery. So I used whatever I have at home. This is quick, easy, and tasty.


Ingredients:

1 lb ground pork
1/2 cup dried shrimps
1 bag fried fish balls
1 bag fried tofu (optional)
2 tomatoes
1 egg
1 can chicken broth
1 bag xl rice noodle
1 can crab paste
1 tbsp chopped
2 tbsp oil

Method:

1. Cook the noodle in boiling water for 14 minutes or until cook. Drain and rinse with cold water.
2. Add 2 big soup bowl of water in a pot and bring to boil. Add in the can of chicken broth.
3. Chop the meat until very fine. Add in some salt, sugar, fish sauce for seasoning. Mix in 1 egg.
4. In a separate pan, fry the garlic, crab paste, and meat. Pour this mixture in the soup pot.
5. Rinse the fried fish balls and tofu. Add this in the soup pot. Let it simmer and bring to boil. Add in the chopped tomatoes and let it boil again. Now add in 2 tsp salt, 2 tsp fish sauce, 2 tbsp sugar to taste. Add more seasoning if needed.
6. To serve the noodle hot, us a small pot to boil some soup and then add in the noodles. Bring to boil and serve with some chopped scallion.